
Starcraft 2 is coming
out...![]()
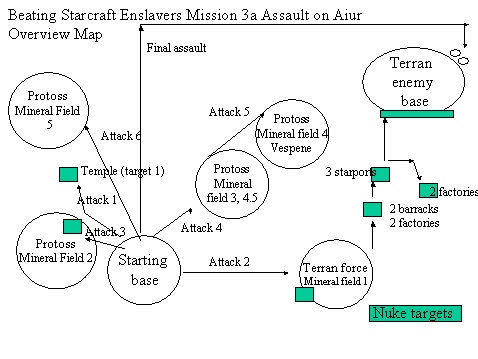
Strategy: How to beat Starcraft Mission 3a: Assault on Aiur
How to beat Starcraft Enslavers Mission 3b: The Final Blow
How to beat Starcraft Enslavers Dark Vengeance - Mission 3: Nemisis
Beating Enslavers 4a: Desperate Measures
***
What you need to play:
Enslavers Missions 3a, 3b (not Dark Vengeance) should not require additional download (requires Starcraft). To play: Launch starcraft, select Play Custom>Campaign>Enslavers3a (or 3b)
Download Enslavers Dark Vengeance Campaign (requires Starcraft Brood War)
***
This page is completely unrelated to the remainder of AmericasWonderlands.com (where you can see my photography or download screensavers). I'm posting this information because I think this game is fun and because I thought some of you might like some help with with a few of the more difficult missions. In my search for help, I wasn't able to find any information about these missions although Gary Appenzeller has a lot of great information about the other missions on his site. Keep reading for help beating mission 3a.
If you have trouble viewing the map or want a printable version, try the pdf (requires Adobe Acrobat Reader). Click here for the pdf. Note: 3b is not yet included in the pdf.
How to beat Starcraft Enslavers Mission 3a: Assault on Aiur without cheating ;-)
To play: Launch starcraft, select Play Custom>Campaign>Enslavers3a
(how I did it)… by Kevin Venator
Initial game stages
Establish strong defenses at each opening including 2-3 bunkers (w/marines), 3-4 siege tanks and 2-3 missile turrets.
Build a ring of additional missile turrets by placing one periodically within the perimeter formed by the terrain. Build a couple of additional bunkers inside the perimeter (2 on the left and one on the right to fend off air attacks).
Build some wraiths to provide air cover over openings
Build 2 science facilities (first - 1 w/covert ops, later 1 w/ physics lab)
Build a couple of science vessels to place near openings (can be used to protect defenses and reveal cloaked ghosts trying to nuke you)
5 or so battle cruisers with yamato guns
8 or so siege tanks
Numerous marines and ghosts
Place a couple of lockdown enabled, energy improved, ocular range increased ghosts at each opening and have plenty in reserve to send nukes. Create a number of ghosts with lockdown as quickly as possible. Place a couple at each opening with the intent of locking down any battlecruisers, protoss carriers, siege tanks etc.
Improve vehicle and ship weapons and armor along the way. Try to max these out without compromising your offensive capabilities.
Build a nuke
General tips
Every time you’re being attacked, slow the game down immediately by pressing the (-) sign a bunch of times, you may speed it back up later (+).
Slowing the game down enables you to issue commands to organize defenses against attacks (e.g. send several different ghosts to lockdown different airborne threats)
Save the game frequently… especially before any offensive actions, after successful defensive stands and immediately upon hearing that the enemy has launched a nuke (this will let you look around (with SV’s or comsat scans) and find it and go back to a saved version if it took you too long).
Escort offensive moves with an SV. Cloaked ghosts may lockdown your forces and shoot away without resistance. SV’s can protect vessels with the defensive matrix and reveal ghosts for others to shoot at.
Move in force with 2-3 battle cruisers as air cover.
Keep scv’s gathering vespene from deleted geysers. The flow is slower but still steady.
The intent of the first stage of the game is to rapidly build an offensive force.
Destroying the temple
Destroy the temple as soon as possible. This is your most immediate goal
Destroying the temple prevents any further expansion of the Protoss forces. Failure to destroy the temple will result in an overpowering protoss enemy.
Send alternating battle cruisers to approx 10 o’clock from the top base opening. Use yamato guns to clear a path for the cloaked ghosts to the bridge. Protect the cruiser with a defensive matrix.
Send a cloaked ghost over the bridge and again to about 10 o’clock from the top of the bridge to w/in site of the temple
Nuke the temple twice
Leave the other protoss forces alone for now
Going on the slow & steady offensive
While still on your original supply of minerals and vespene, build another nuke and send a cloaked ghost to the right and nuke the Terran bunker
Leave the ghost there, build another nuke and nuke the factory while gathering forces as noted below
Gather forces including 3-4 battle cruisers, 4-5 siege tanks, a couple of scv’s to fix damaged ships/vehicles, a few trailing ghosts to lockdown any attacking battle cruisers, 10 marines, a few goliaths etc and launch an offensive to the right against the terrans. Go slow, leap frog siege tanks escorted by marines, battle cruisers and the scv’s and SV. Wipe out everything on this side of the bridge.
Don’t advance across the bridge.
Build a new base by the mineral field
Build a bunker and missile turret near the base of the bridge and leave forces there while you gather all the minerals that remain in the nearby field.
Once depleted, move all forces and new base back to the home base area
Continue to build offensive capabilities and upgrading
Send a ghost to nuke the protoss forces on the left. Follow up with a couple of yamato strikes from battle cruisers and move in with an offensive force such as that described above.
Build a bunker and missile turret near the bridge, have a ghost or two nearby and leave a couple of battle cruisers to defend the area.
Move base near the mineral field and bridge and gather all the minerals
Build 2-3 dropships for later
When depleted, move to the next mineral field…
Across the water from the home base at approx 2 o’clock is the 3rd mineral field. Send alternating battle cruisers to destroy light defenses with yamato guns.
At the mineral site, build a couple of bunkers, and a couple of missile turrets, relocate one of your bases. Have at least a couple of ghosts nearby, 3 battle cruisers an SV. This area will be attached more often. Send a couple of siege tanks also (land vehicles and troops can travel around to get here). When a comfortable offensive capability is established, send alternating battle cruisers to about 2 o’clock and destroy the protoss equivalent of missle turrets with yamato guns. A fourth mineral field and undepleted vespene geyser is at about 2 o’clock from the 3rd site. Send some marines and/or other forces to destroy the protoss structures. I didn’t encounter too much resistance to clearing the protoss structures; but keep an eye on them.
When the protoss forces are cleared, build a third base near the 4th mineral field. Establish a defensive perimeter while still gathering from the 3rd mineral field. When ready, relocate base from undepleted 3rd mineral field to new location (two bases now near 4th mineral field and vespene geyser). This allows you to consolidate defenses and gather minerals and vespense rapidly.
Enemy ghosts will try to nuke you at mineral fields 3 and 4 so be sure to have an SV at each location (remember to save the game immediately) and slow the game down during any attack.
|
Alternative victory plan: After securing mineral field 1, send a ghost to nuke the factories across the bridge, then follow with force to destroy them quickly (e.g. 3-4 battle cruisers, marines, SV, etc.) Pull back after the factories and barracks are destroyed. Nuke the 3 starports immediately afterwards. Later in the game, if all goes well, you've got a lot of minerals, 8 or so battle cruisers and a secure position at mineral field 4. Keep a bunch of scv's gathering from the 3 or so depleted vespene geysers. Build a second nuclear silo and keep building nukes and dropping them. You can follow the plan described in the main text or send a cloaked ghost to the right of the 2 barracks / 2 factories mentioned above. Keep ghosts in ready striking position at the lower portion of the map. Send the ghosts around to the right of the starport enclosure nuking as you go. First the academy and supply depots (rather benign but will destroy some spider mines). To the north are the factories and another starport. Watch for enemy SV's... may need to lock them down to pass or send a battle cruiser down and around just to take it out. You'll eventually be able to walk in to the enemy stronghold nuking the whole way. BOOOM!! |
Once the 4th mineral field is depleted continue gathering vespene even if the geyser is depleted. Move one of your bases back to the 3rd mineral field and gather the rest of the minerals. Keep gathering vespene. You’ll be a little spread out for a while until the minerals are gone. Once all the minerals are depleted move everything back to home base.
While gathering from the various mineral fields your 2nd offensive target is a group of enemy starports. Send a ghost to the right of home base to the first remote bridge near the first remote mineral field (where you cleared the Terran forces). Cloak the ghost, send them across the bridge and straight up to nuke a couple of factories (might have to nuke the bunker /missle turrets directly across the bridge and/or destroy it during mineral gathering from field 1).
Next target (go straight past the factories and barracks) just up the ramp until you can barely see the first starport and nuke it. Don’t go too far or the missile turrets will reveal the ghost and get it killed. Nuke the area again until all three starports are destroyed. If you don’t get these destroyed, you’ll keep getting attacked by numerous battle cruisers. Go back later and nuke the factories until destroyed.
Tips: save the game immediately before trying to send the ghost up the ramp. Occasional enemy SV’s will reveal the ghost. If confronted by an SV, lock it down or nuke just in front of it’s range.
Nuke the enemy relentlessly. Just above the 3 starports is the enemy stronghold. Ghosts can drop nukes on parts of it from here. Also to the north of the starports, then around the ridge to the right are a couple of addt’l factories.
Continue to build battlecruisers until you have about 8. Add another nuke silo to a second base.
The last mineral field is in the upper left corner. Send alternating battle cruiser with yamato to blast the protoss equiv of missle turrets. Relocate your mineral gathering forces to the new location, build defenses and gather until gone.
Once all the minerals are near gone, send drop ships with siege tanks, battle cruisers and SV’s to the top of the map directly above the home base. Stay at the top of the map and send all ships to the far right corner. Just below the top right corner of the map are two enemy bases with nuke stations attached. Send battle cruises down to yamato and destroy the bases. Try to keep the battle cruisers on the far right of the map to make it harder for the enemy to reach. Unload siege tanks on the wall, send them to the southernmost part of the wall near the entrance to the bases and put them in siege mode. Send the SV above the tanks and protect them with the defensive matrix. I was able to mount a successful assault with only two siege tanks a couple of scv’s and 6-7 battle cruisersl but it was close. You can use an empty land space in the top right corner as a staging area, thus requiring fewer drop ships. Once the immediate attacks are repelled. Use the drop ship to lower the siege tanks to the ground.
Move slowly and deliberately through the area escorting with battle cruisers and siege tanks.
Some afterthoughts: research SV EMP shockwave and use it against the shielded protoss forces and any approaching battle cruiser.
Use spider mines earlier around base and on bridges in defense of mineral gathering and against the repeated attacks on the base.
May also use comsat station to reveal cloaked enemies.
Good luck.
If you find this helpful, send me a note. Contact us
How to beat Starcraft Enslavers Mission 3b: The Final Blow
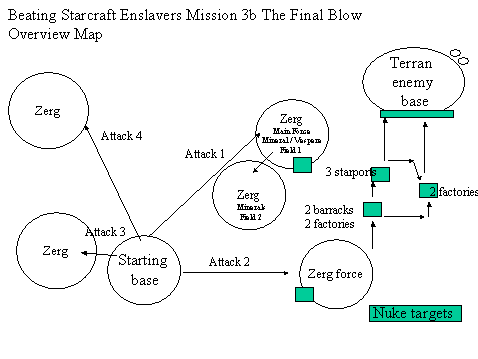
The main threat in 3b is the Torrasque - a powerful Zerg creature that will eventually overpower you unless you can get the Zerg production line destroyed. One unique aspect of 3b is that you command both Terran and Protoss forces.
Initial game stages
Establish strong defenses at each opening. Immediate load the Protoss Reaver (warbinger) with scarabs.
Build a few additional Protoss Photon Cannons at each opening. These can attack air and ground targets. Remember to recharge their shields when damaged using the Shield Battery. Any protoss structure that's "unpowered" needs a Pylon constructed nearby.
Proceed to develop your forces in a similar fashion to 3a as described above with the following exception:
* Build a Protoss Robotics facility
* Build a Robotics support bay
* build a couple of additional Reavers, populate them with scarabs and put them at each of the base entrances
* upgrade scarab damage when resources are available after Attack 1
Going on the offensive
Build a nuke, a dropship (or two) and 6-7 battlecruisers
In the dropship put a couple of ghosts, a reaver and a couple of SCVs
Fly an SV, 4 battlecruisers, plus a couple of additional airborne attack vehichles (wraiths & protoss equivalents) and the dropship to Attack location 1 at approx 2 o'clock from home base (you may have to clear the path just across the water of air defenses).
Continue to build battle cruisers
When you get close, unload the ghost, cloak it and nuke an area with highly concentrated Zerg structures.
If the Torrasque appears, load the ghosts, scv's and reaver back into the dropship. Unload them when it's gone. If the Reaver runs out of scarabs and you're out of minerals, load it back into the dropship.
Clear the area. Send reinforcing battlecruisers when available.
Once this area is clear, the Torrasque threat is eliminated and you can proceed in similar fashion to mission 3a above (the layout is basically the same).
Proceeding after the Torrasque threat is gone
Move base to mineral field 1 and use the dropship to fly in SCVs from the base
gather minerals quickly and build defenses around the area of field 1 as soon as possible including missile turrets
Repair damage to battlecruisers and everthing else
Fly over a couple of ghosts to lock down enemy battlecruisers
Keep and SV nearby to reveal cloaked ghosts trying to nuke you
save the game frequently (especially before offensive maneuvers and slow it down (-) during attacks
Proceed to destroy the Zerg forces to the immediate right of home base. Drop a nuke or two and clear the area with 3-4 battle cruisers. Use trailing ghosts in case the enemy throws terran forces at you that you can lock down. Escort the battle cruisers with a couple of wraiths (or protoss equivalent)
If not destroyed already, yamato gun the two turrets just on the other side of the bridge and/or nuke the bunker. Ghosts will be present and may lockdown your battlecruisers so nuking might be preferable.
Once cleared, attack the Zerg forces to the immediate left and upper left.
Simultaneously nuke the Terrans with priority on destroying the 3 starports to the immediate north of the bridge (where the bunker and missile turrets were for Zerg attack 2)
When the field 1 minerals are gone, switch to gathering vespense until you have plenty then move the base and establish defenses at field 2.
The rest of the game proceeds as 3a... nuke the Terrans relentlessly while amassing 10 or so battle cruisers. Once the 10 or so battle cruisers are ready, fly them in with an SV and mow them down.
site material copyright 2003 K. Venator
How to beat Starcraft Enslavers Dark Vengeance Mission 3: Nemisis
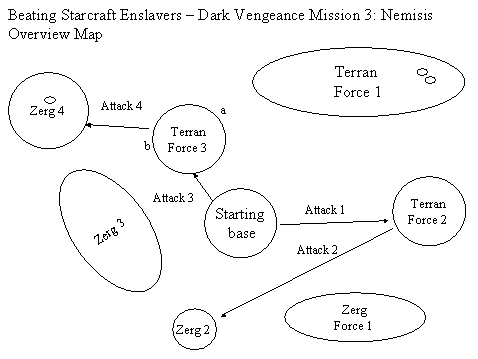
Whew?!? This was a tough one.
Helpful elements:
- place high templars around the perimiter of the base and enable the psionic storm.
- build a bunch of carriers and accompany each group with an arbiter with stasis field
- build ample shield generators close to the action (not at the center of the base)
- Take out Terran Force 2
- Move a couple of high templars and an observer over there along with some carriers and land forces (e.g. zealots, dragoons).
- Establish defensive positioning including Photon Cannons and Shield generators and arbiter (if you have one)
- Exhaust the minerals and vespene
- beware battle cruiser attacks.
- As the minerals and vespene begin to deplete, send a light force (perhaps 4-5 zealots) to take out Zerg 2. Build a Nexus at Zerg2. When the nexus is finished, abandon Terran Force 2 and defend Zerg 2 while minerals and vespene are gathered.
- Beware of zerg drops while at Zerg 2 and have sufficient defenses available.
- Ignore Zerg force 1 and go around.
- Ignore Zerg 3
- Build additional carriers and 3 or so arbiters
- build some zealots, dragoons and dark templars
- build a couple of reavers (upgrade storage)
When Minerals and vespene near depletion at Zerg 2, prepare to abandon the site (save enough minerals for Nexus at Terran Force 3). Send force of 6-7 carriers at Terran Force 3 accompanied by a couple of Aribiters. As defenses begin to give way, send some zealots and dark templars in to stave off goliaths and hydralisks. Watch the carriers and send them back to recharge shields as needed.
Once the area is secure, build a nexus and establish defenses. At the ramp near Terran Force 3 (location a); build a couple of photon cannons and place a reaver on the left side of the ramp. Place a couple (3) of carriers close behind the cannons. Build 4 or so shield regenerators to recharge the carriers. Place a couple of high templars nearby. Don't keep a lot of zealots nearby as the enemy likes to sneak tanks up in siege mode and blast at the land units. Avoid the temptation to attack (other than sneaking in the occasional psionic storm). Stay defensive at this area and let the enemy keep coming at you. Beware enemy science vessels, they are all over the place and you'll have to recharge shields frequently.
At Terran force 3 position (b) build 3-4 cannons, place some land units there and keep 3 carriers behind the cannons and a shield generator right behind. This area is prone to zerg drops. Just around to the bottom of position b build another cannon and leave a carrier with a couple of accompanying units for defense.
At Terran force 3, build 3 or so photon cannons near the ramp at the bottom nearest the starting base. PLace a reaver nearby and a high templar. This area is attacked occasionally; but not as much.
Leave ample defenses at the home base and make all available upgrades deemed necessary. Build a Stargate and a couple of Gateways at Terran Force 3... in preparation to abandon the starting base. Once established; build more carriers until you have 8-9. Build drop ships and keep cranking out units from mulitple gateways as fast as you can.
Beware Battle Cruiser and Zerg drops at the home base the whole time and abandon when Terran Force 3 infrastructure is established.
Once substantial force is established, attack Zerg for with carriers in force and drop land forces. Save the game and try the attack. If there's too many zerg, stay defenisve until they attach your defensive position a couple of times, then go. Patient defense is a key to winning this mission.
I found attacking the Terran's much harder due to the EMP of the science vessels blasting the carrier shields. However, I built 5-6 shield regenerators near position a and just kept sending the carriers back for recharge. Once a foothold was established down the ramp, I built a pylon and cannon and generator closer to the action and did this a few more times. To be fair, I didn't make the Terran attack until wiping out the Zerg and establishing another Nexus at Zerg 4 (ignoring the crystal just to the south).
To win, take the crystal or keep playing to destroy the command centers.
Beating Enslavers Dark Vengeance 4a: Desperate Measures
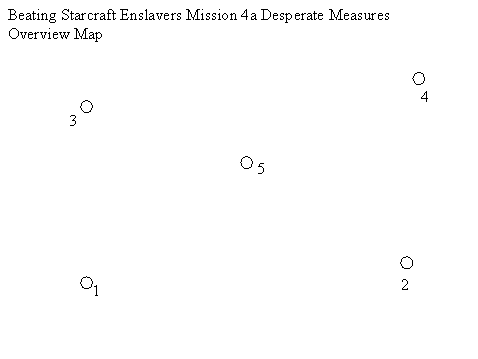
The trick to winning this mission is to use the mind control ability of the Dark Templar to get the most powerful allies.
Though not an overly complex mission, a couple of points I found helpful to winning.
- At point 3, use mind control to get the ultralisks.
- At points 4 and 5, use the observer to disclose the location of burrowed enemy and psionic storm to destory them
When taking the crystals, rush in with a front line of forces and send the Dark Templar right behind. The idea is to get the enemy engaging other troops while you rush the templar past the action.
Point 5 is the most heavily defended.
You may be able to get a couple of additional ultralisks so keep a look out.
Here's a trick...
- stage your troops in the open area to the right of the crystal (far enough away to keep the Guardians from seeing you)
- bait a couple of the guardians... send something close enough to get them attacking and then run back. The guardian should follow taking them away from the scourges. You can then mind control them safely without the scourges destroying them immediately.
- After getting a couple of guardians, destroy the outlying burrowed colonies. Be careful as each guardian can take only one or so scourge hits. Send them close to bait the scourge. Take the hit and either go recover or destroy the colony close by. Repeat until the ones closest to the crystal are destroyed.
- Rush the crystal with a front line of troops. Send the Dark Templar close behind right to the crystal.
Beating Enslavers Dark Vengeance 4b: Turnabout
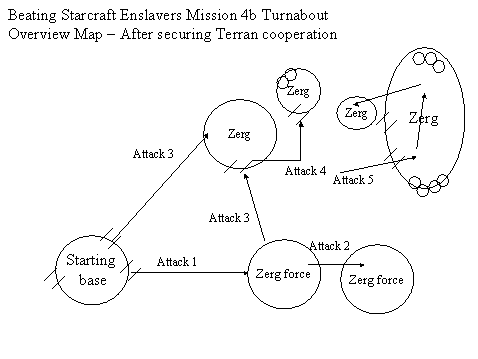
This was another hard mission to win. Are you getting stomped by swarms of zerg? Me too.
** This description picks up after the cooperation with the Terran's is secure. **
- One of the keys to this mission is to have a couple of nuke silos ready to go, a healthy line of siege tanks and marines
- The zerg will rally in points just out of view and then swarm your forces. Use cloaked ghosts as nukes become ready to patrol the areas where you've notice the forces rallying. Nuke them. This happens a lot.
- Save the game frequently. Save the game after a successful nuke of a rally.
- if you get swarmed, go back to a previous saved game and search out the rally point and nuke them
- Notes on attack 3: Immediate after nuking a good rally send 5-6 siege tanks with marine, scv and battle cruiser (3) escort to attack this area. Use scvs to keep vechicles in repair and marines and battle cruiser to keep Queens away. It seems that this area is the fueling point for the Zerg forces. I don't have any good reasoning for this except that after it was destroyed, no more swarming occurred.
Once the area is clear, overlords will keep trying to come into the area. If you keep a couple of wraiths near the top and a couple of marines patrolling the area, they will stay out.
If you can sneak a nuke or two into the bottom-most area of attack 5, you can do a lot of damage. However, it's hard to keep the ghost from being revealed by Overlords.
Alternative possibilities: send a number of battle cruisers south of Attack 5 and come up from the bottom. Yamato the area especially anything that would clear the path for a ghost to get close.
- Perhaps try attack 3 earlier in the game. I may have waited too long... especially if my theory about it being a fueling supply is correct.