
Photography Techniques
![]()

Home | Interpolation Methods | Imaging Services | Screensavers | Feedback
Interpolation Defined | Photo Tips 1 | KC Pictures
|
Photography Techniques
Home | Interpolation Methods | Imaging Services | Screensavers | Feedback Interpolation Defined | Photo Tips 1 | KC Pictures
|
Photography Techniques - Article 2
This article contains photography techniques related primarily to landscape and cityscape photography. Topics include Place, Patience, Timing, Light and Luck.
|
Tips & Photography Techniques in Article 1 Framing Using diagonal lines Including foreground Depth of field Filters ISO, Shutter Speed, Aperture Using a tripod Choice of film Digital or film?
|
Article 2 Topics:
|
 Place:
Being at the Right Place.
Place:
Being at the Right Place.
"The Right Place" is defined herein as a location that provides the photographer with the opportunity to get a good photo. The key to finding the right place is to visit places that you think might offer a variety of photo opportunities. Some places are more target rich than others. National Parks, for instance, usually feature landmarks that are obvious choices; but there are ample opportunities elsewhere... you just have to look for them.
|
Clicking through the link below when you shop Amazon also helps...
|
Examples of places that might prove interesting include zoos or arboretums. A trip downtown or a drive out in the country can yield some good photo opportunities. Local landmarks, festivals, old buildings and parks are also good spots. The key message here is simply to go to different places and take pictures. If you're in a spot that isn't great, keep moving.
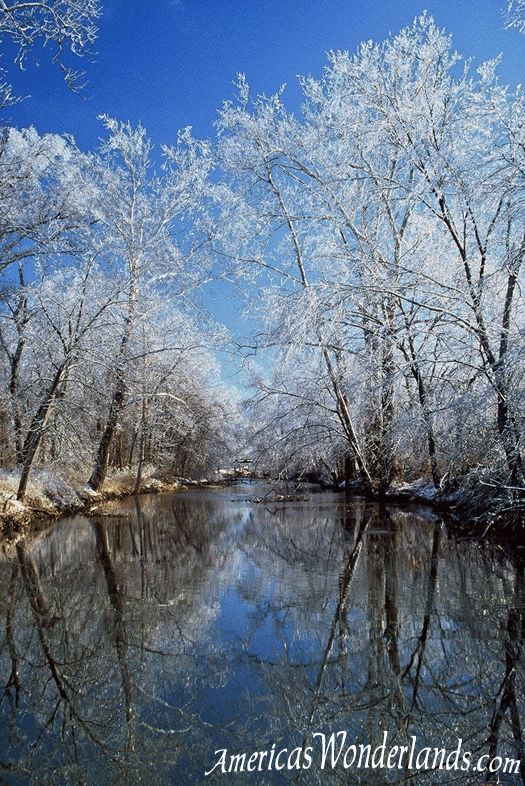
Example: There was a big ice storm in Kansas City. Power was out all over the city and all of the trees were coated with ice. I wandered far and wide trying to get some good pictures. I tried to recall places that I'd been as well as other places that might offer some unique scenes under these particular conditions. I spent all day going from place to place and encountered other photographers along the way. Their strategy... keep moving while keeping an eye out for good photo opportunities. The photo to the left was taken along a walking path near a creek. The reflection caught my eye resulting in the photo on the left.
Example: If
there's an event coming up (e.g. fireworks), scout the location a day or two
beforehand so you know where they will be shot and position yourself
accordingly.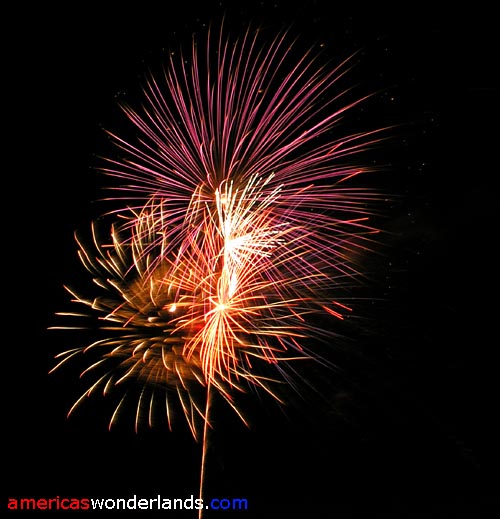 I had attended a local fireworks show in the past and knew where to position
myself for a nice view of the show (see photo to the right).
I had attended a local fireworks show in the past and knew where to position
myself for a nice view of the show (see photo to the right).
A key point in finding a good place is noting the optimal conditions for the places that you've already visited. Is this location better suited for morning or evening? Would this location be better in the Summer or Winter? Make a mental note and go back when conditions are right.
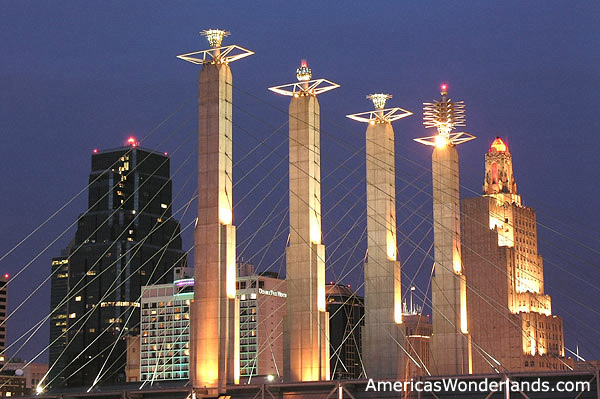
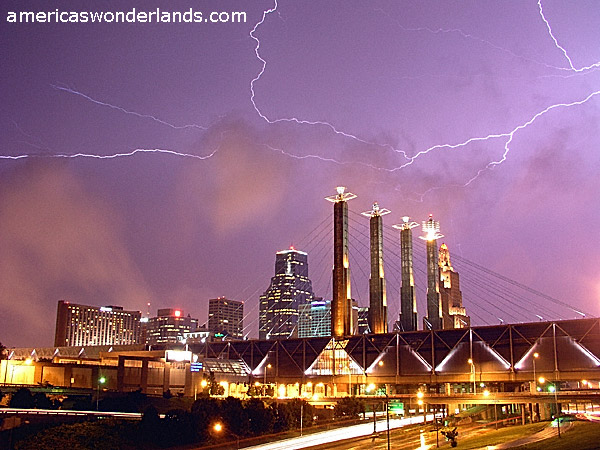
Example: I'd been
to downtown Kansas City taking pictures of the skystations (a local landmark) -
see left photo below. A few months later a severe thunderstorm rolled through
the area. I wanted to try and get some photos of lightning along with some
interesting foreground. I recalled the shot from the previous trip...
it was taken looking northeast which appeared to be where the storm was headed.
The angle would provide some interesting foreground while still including plenty
of sky. I dawned the rain gear and slopped through the mud. I set up the
tripod under an umbrella and began taking pictures. After several
exposures, several bolts of lightning filled the sky. I looked down to see
if the shutter was still open and I knew I'd gotten shot. A little
planning, a bit of persistence and a little luck combined to place me at the
right spot at the right time.
Key messages:
get out, go places and take pictures
note the optimal conditions for the places you've visited and return when conditions are right
 Patience:
You might be in the right place; but don't know it.
Patience:
You might be in the right place; but don't know it.
Take your time. Don't rush. Experienced SCUBA divers will tell you to take your time and look around. Some of the most interesting sea life can be right under your nose and you won't see it. The same goes for taking pictures.

Example: I was hiking in the Gila Wilderness and noticed a large yellow butterfly. It flew away. I told myself, "the next one of those I see, I'm going to try and get some photos." I kept hiking and nearly stepped on one. It flew away. I stopped and watched it get farther away and then turn around. It came back and landed in the same spot. I took off the backpack and began stalking the butterfly ;-). I would take a couple of pictures and it would take off again only to return (I think it liked eating something in the mud). I must have shot 2 full rolls of film trying to get a good shot. After a while, it didn't perceive me as a threat and I was even able to pick it up.
Example: wildlife photography requires much patience. You can be at the right place and have to wait a long time.
Example: if at a good location near sunset, stay there and enjoy it. The lighting will be that much better if you stick around just a little while.
Key messages:
take your time - don't rush
give yourself the best chance at getting a good shot... wait for the best lighting or return later
invest some time in a subject that's worthwhile
 Timing:
Make it the right place at the right time.
Timing:
Make it the right place at the right time.
In a nutshell, getting a good photo requires being at the right place at the right time with the right knowledge and equipment.
The idea is to try and create good timing.
 Ways
to help improve your chances of good timing:
Ways
to help improve your chances of good timing:
Take your camera along on trips even if you might not expect to take pictures. I got photos of the most dramatic rainbow I'd ever seen simply because I had the camera in the car at the time.
Recall the places that you've been when unique conditions are present (i.e. fireworks, ice storm, sunsets, sunrises, winter, spring, fall). Go to those places offering the best photo ops given the conditions.
If hoping to take pictures at the ballpark, go when it's crowded and in the evening.
Go to the rose garden when the flowers are blooming and just after a rain or early in the morning when dew drops are on the petals
take waterfall an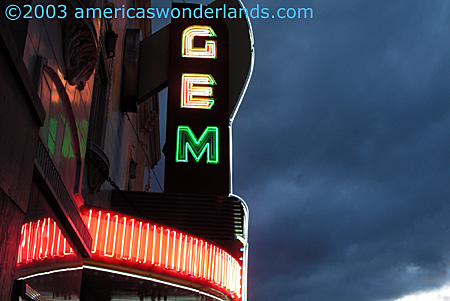 d
people pictures on overcast days
d
people pictures on overcast days
when traveling, be somewhere at sunset and sunrise
some of the most interesting photos are possible during the least appealing weather
animals come out during the calm after the rain
Visit different places. Return to places when conditions are optimal
keep moving but don't rush
humidity is lower in the winter thus resulting in less atmospheric haze
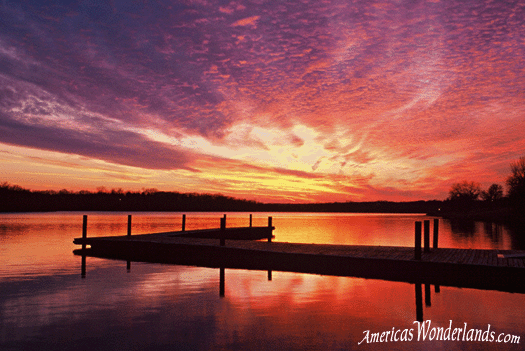
blankets of clouds are more common in the winter. When blankets of clouds are in the area, watch for openings on the horizon that will allow the sun to shine through and illuminate the clouds after sunset (don't leave too early... the colors are most dramatic after the sun goes down and shines up onto the clouds - see sunset photo below).
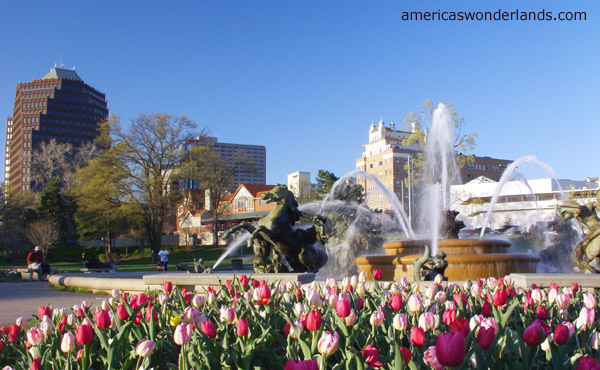
Example: I knew they planted flowers in front of a local fountain (see photo above right). I drove by to scout the location and the tulips weren't quite ready and it was cloudy. I returned one clear evening about a week later and got a nice photo with the tulips in bloom.
Example: it was cloudy and sprinkling; but we went to the local jazz district in spite of the conditions. The dark clouds behind the neon sign ended up making the photo of the sign more dramatic (see photo above right).
Key messages:
some elements of timing are under your control
visit a variety of different places and return when the conditions are right
 Light:
the right light will make or break a photo
Light:
the right light will make or break a photo
Lighting conditions can be a function of timing and patience. You also need to be in the right place to take advantage of optimal lighting on a subject. For example, if shooting at sunrise with the sun at your back, you'll need to be on the east side.
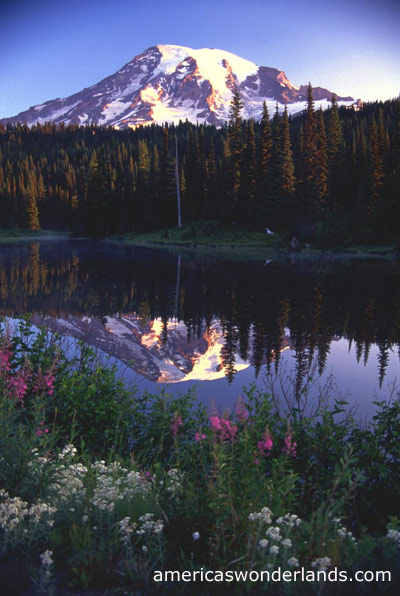 Example:
I was driving through Mt Rainier National Park with the hope of getting a
nice shot of the mountain. It was evening so I was trying to get around to
the west side to shoot it at sunset. It got too late so I missed the
chance. Not to be discourage, I continued my drive through the park and
noticed these small lakes by the road. The orientation of the lakes with
the mountain was such that I thought it would make for a nice sunrise shot.
I stayed nearby and returned in the morning to a calm lake and a wonderful
sunrise. A photographer from the area who was also taking pictures said
that I'd timed it perfectly because the mountain is so often covered by clouds
(lucky again).
Example:
I was driving through Mt Rainier National Park with the hope of getting a
nice shot of the mountain. It was evening so I was trying to get around to
the west side to shoot it at sunset. It got too late so I missed the
chance. Not to be discourage, I continued my drive through the park and
noticed these small lakes by the road. The orientation of the lakes with
the mountain was such that I thought it would make for a nice sunrise shot.
I stayed nearby and returned in the morning to a calm lake and a wonderful
sunrise. A photographer from the area who was also taking pictures said
that I'd timed it perfectly because the mountain is so often covered by clouds
(lucky again).
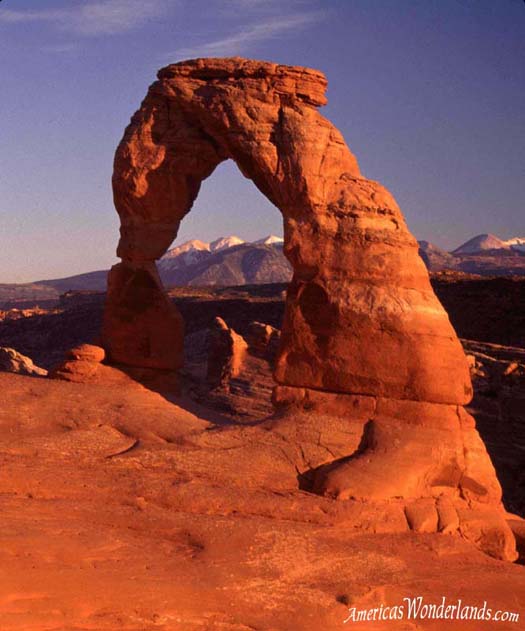
You can maximize your chances of getting good lighting by understanding the subject. You can do this by scouting the location or asking someone. Is Delicate Arch best shot in the morning or evening?
 A
few general pointers regarding light:
A
few general pointers regarding light:
Evening or morning light is best for landscapes. The light is warmer and softer.
Cloudy / overcast light is best for taking photos in situations when highly diffused lighting is beneficial including waterfalls, flowers and people.
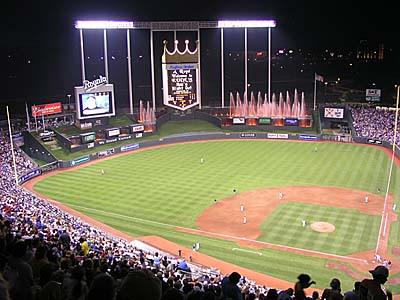
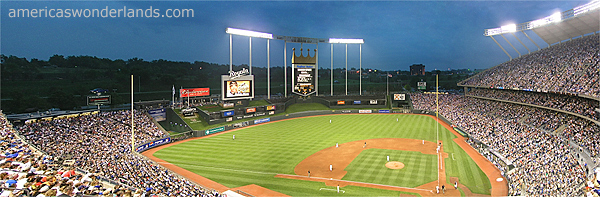
Twilight is great for cityscapes (notice the blue sky in the panoramic above as compared with the dark sky later in the evening). Once it gets dark, the lighting gets really harsh and unappealing.
Avoid using the flash if possible
Be someplace at sunset and sunrise. You can shoot the sunrise/sunset or shoot with the sun at your back for warm color tones on your subject. The Delicate Arch picture was taken near sunset.
The best time to take photos is from about 10 minutes before to 10 minutes after sunrise/sunset.
If shooting with the sun at your back at sunset to illuminate a subject in warm light, you can only shoot until the sun dips below the horizon. If shooting at sunrise, you have about 10-15 minutes of nice, warm light before the warm colors diminish.
Cityscape twilight photos such as the ballpark photo above (see also the skystations photo 1 above) can be taken until the sky darkens up.
Key messages:
understand your subject and it's optimal lighting conditions
be somewhere at sunrise and sunset
take cityscape pictures at twilight
A really great photo will almost always involve some degree of luck. Here are some ways you can improve your chances of 'getting lucky'.
 practice....
get out and take pictures.
practice....
get out and take pictures.
persistence... if you know you're at the right place; but the wrong time, go back.
Example: I was familiar with the dock at Shawnee Mission Park and thought it would make a nice sunset shot (the shot would be taken over water looking west with an expansive horizon). Every night that there appeared to be a good chance for nice sunset, I would drive out there, set up and wait. It took several trips out to the park in very cold weather before getting a good shot... BUT I GOT IT.
knowledge... learn about your camera and equipment so that you can take advantage of it's abilities. Learn different photo taking techniques and accessories that can help improve your pictures (e.g. filters, tripod, etc... see Photography Tips - Article 1).
take pictures... improve your odds by taking more pictures
be at the right place at the right time... get out and go places (take pictures or just scout it out). Go back to places when conditions are optimal.
Key messages:
Improve your chances of getting lucky through: practice, persistence, knowledge, taking more pictures and noting the importance of place, timing and light.
*** End of Photography Techniques - Article 2 ***
Go to article on photo interpolation - Image resizing
(talks about how big you can make enlargements from digital image files)
Go to the comparison of the interpolation tools
(compares images enlarged with different software tools)
AmericasWonderlands.com Imaging Services - Digital Photo Processing
(we make enlargements of your digital photos)
Framing
Using diagonal lines
Including foreground
Depth of field
Filters
ISO, Shutter Speed, Aperture
Using a tripod
Choice of film
Tips for choosing between digital and film cameras
Article 2 topics:
Place
Timing
Luck
Light
Site material copyright 2003 K. Venator
All rights reserved.
AmericasWonderlands.comTM, America's WonderlandsTM